mirror of https://github.com/open-mmlab/mmpose
754 lines
33 KiB
Markdown
754 lines
33 KiB
Markdown
# 20 分钟上手 MMPose
|
||
|
||
MMPose 1.0 与之前的版本有较大改动,对部分模块进行了重新设计和组织,降低代码冗余度,提升运行效率,降低学习难度。
|
||
|
||
MMPose 1.0 采用了全新的模块结构设计以精简代码,提升运行效率,降低学习难度。对于有一定深度学习基础的用户,本章节提供了对 MMPose 架构设计的总体介绍。不论你是**旧版 MMPose 的用户**,还是**希望直接从 MMPose 1.0 上手的新用户**,都可以通过本教程了解如何构建一个基于 MMPose 1.0 的项目。
|
||
|
||
```{note}
|
||
本教程包含了使用 MMPose 1.0 时开发者会关心的内容:
|
||
|
||
- 整体代码架构与设计逻辑
|
||
|
||
- 如何用config文件管理模块
|
||
|
||
- 如何使用自定义数据集
|
||
|
||
- 如何添加新的模块(骨干网络、模型头部、损失函数等)
|
||
```
|
||
|
||
以下是这篇教程的目录:
|
||
|
||
- [20 分钟上手 MMPose](#20-分钟上手-mmpose)
|
||
- [文件结构](#文件结构)
|
||
- [总览](#总览)
|
||
- [Step1:配置文件](#step1配置文件)
|
||
- [Step2:数据](#step2数据)
|
||
- [数据集元信息](#数据集元信息)
|
||
- [数据集](#数据集)
|
||
- [数据流水线](#数据流水线)
|
||
- [i. 数据增强](#i-数据增强)
|
||
- [ii. 数据变换](#ii-数据变换)
|
||
- [iii. 数据编码](#iii-数据编码)
|
||
- [iv. 数据打包](#iv-数据打包)
|
||
- [Step3: 模型](#step3-模型)
|
||
- [前处理器(DataPreprocessor)](#前处理器datapreprocessor)
|
||
- [主干网络(Backbone)](#主干网络backbone)
|
||
- [颈部模块(Neck)](#颈部模块neck)
|
||
- [预测头(Head)](#预测头head)
|
||
|
||
## 文件结构
|
||
|
||
MMPose 1.0 的文件结构如下所示:
|
||
|
||
```shell
|
||
mmpose
|
||
|----apis
|
||
|----structures
|
||
|----datasets
|
||
|----transforms
|
||
|----codecs
|
||
|----models
|
||
|----pose_estimators
|
||
|----data_preprocessors
|
||
|----backbones
|
||
|----necks
|
||
|----heads
|
||
|----losses
|
||
|----engine
|
||
|----hooks
|
||
|----evaluation
|
||
|----visualization
|
||
```
|
||
|
||
- **apis** 提供用于模型推理的高级 API
|
||
- **structures** 提供 bbox、keypoint 和 PoseDataSample 等数据结构
|
||
- **datasets** 支持用于姿态估计的各种数据集
|
||
- **transforms** 包含各种数据增强变换
|
||
- **codecs** 提供姿态编解码器:编码器用于将姿态信息(通常为关键点坐标)编码为模型学习目标(如热力图),解码器则用于将模型输出解码为姿态估计结果
|
||
- **models** 以模块化结构提供了姿态估计模型的各类组件
|
||
- **pose_estimators** 定义了所有姿态估计模型类
|
||
- **data_preprocessors** 用于预处理模型的输入数据
|
||
- **backbones** 包含各种骨干网络
|
||
- **necks** 包含各种模型颈部组件
|
||
- **heads** 包含各种模型头部
|
||
- **losses** 包含各种损失函数
|
||
- **engine** 包含与姿态估计任务相关的运行时组件
|
||
- **hooks** 提供运行时的各种钩子
|
||
- **evaluation** 提供各种评估模型性能的指标
|
||
- **visualization** 用于可视化关键点骨架和热力图等信息
|
||
|
||
## 总览
|
||
|
||

|
||
|
||
一般来说,开发者在项目开发过程中经常接触内容的主要有**五个**方面:
|
||
|
||
- **通用**:环境、钩子(Hook)、模型权重存取(Checkpoint)、日志(Logger)等
|
||
|
||
- **数据**:数据集、数据读取(Dataloader)、数据增强等
|
||
|
||
- **训练**:优化器、学习率调整等
|
||
|
||
- **模型**:主干网络、颈部模块(Neck)、预测头模块(Head)、损失函数等
|
||
|
||
- **评测**:评测指标(Metric)、评测器(Evaluator)等
|
||
|
||
其中**通用**、**训练**和**评测**相关的模块往往由训练框架提供,开发者只需要调用和调整参数,不需要自行实现,开发者主要实现的是**数据**和**模型**部分。
|
||
|
||
## Step1:配置文件
|
||
|
||
在MMPose中,我们通常 python 格式的配置文件,用于整个项目的定义、参数管理,因此我们强烈建议第一次接触 MMPose 的开发者,查阅 [【用户教程 - 如何看懂配置文件】](./user_guides/configs.md) 学习配置文件的定义。
|
||
|
||
需要注意的是,所有新增的模块都需要使用注册器进行注册,并在对应目录的 `__init__.py` 中进行 `import`,以便能够使用配置文件构建其实例。
|
||
|
||
## Step2:数据
|
||
|
||
MMPose 数据的组织主要包含三个方面:
|
||
|
||
- 数据集元信息(meta info)
|
||
|
||
- 数据集(dataset)
|
||
|
||
- 数据流水线(pipeline)
|
||
|
||
### 数据集元信息
|
||
|
||
元信息指具体标注之外的数据集信息。姿态估计数据集的元信息通常包括:关键点和骨骼连接的定义、对称性、关键点性质(如关键点权重、标注标准差、所属上下半身)等。这些信息在数据在数据处理、模型训练和测试中有重要作用。在 MMPose 中,数据集的元信息使用 python 格式的配置文件保存,位于 [$MMPOSE/configs/_base_/datasets](https://github.com/open-mmlab/mmpose/tree/main/configs/_base_/datasets) 目录下。
|
||
|
||
在 MMPose 中使用自定义数据集时,你需要增加对应的元信息配置文件。以 MPII 数据集([$MMPOSE/configs/\_base\_/datasets/mpii.py](https://github.com/open-mmlab/mmpose/blob/main/configs/_base_/datasets/mpii.py))为例:
|
||
|
||
```Python
|
||
dataset_info = dict(
|
||
dataset_name='mpii',
|
||
paper_info=dict(
|
||
author='Mykhaylo Andriluka and Leonid Pishchulin and '
|
||
'Peter Gehler and Schiele, Bernt',
|
||
title='2D Human Pose Estimation: New Benchmark and '
|
||
'State of the Art Analysis',
|
||
container='IEEE Conference on Computer Vision and '
|
||
'Pattern Recognition (CVPR)',
|
||
year='2014',
|
||
homepage='http://human-pose.mpi-inf.mpg.de/',
|
||
),
|
||
keypoint_info={
|
||
0:
|
||
dict(
|
||
name='right_ankle',
|
||
id=0,
|
||
color=[255, 128, 0],
|
||
type='lower',
|
||
swap='left_ankle'),
|
||
## 内容省略
|
||
},
|
||
skeleton_info={
|
||
0:
|
||
dict(link=('right_ankle', 'right_knee'), id=0, color=[255, 128, 0]),
|
||
## 内容省略
|
||
},
|
||
joint_weights=[
|
||
1.5, 1.2, 1., 1., 1.2, 1.5, 1., 1., 1., 1., 1.5, 1.2, 1., 1., 1.2, 1.5
|
||
],
|
||
# 使用 COCO 数据集中提供的 sigmas 值
|
||
sigmas=[
|
||
0.089, 0.083, 0.107, 0.107, 0.083, 0.089, 0.026, 0.026, 0.026, 0.026,
|
||
0.062, 0.072, 0.179, 0.179, 0.072, 0.062
|
||
])
|
||
```
|
||
|
||
在这份元信息配置文件中:
|
||
|
||
- `keypoint_info`:每个关键点的信息:
|
||
1. `name`: 关键点名称,必须是唯一的,例如 `nose`、`left_eye` 等。
|
||
2. `id`: 关键点 ID,必须是唯一的,从 0 开始。
|
||
3. `color`: 关键点可视化时的颜色,以 (\[B, G, R\]) 格式组织起来,用于可视化。
|
||
4. `type`: 关键点类型,可以是 `upper`、`lower` 或 `''`,用于数据增强 [RandomHalfBody](https://github.com/open-mmlab/mmpose/blob/b225a773d168fc2afd48cde5f76c0202d1ba2f52/mmpose/datasets/transforms/common_transforms.py#L263)。
|
||
5. `swap`: 关键点交换关系,用于水平翻转数据增强 [RandomFlip](https://github.com/open-mmlab/mmpose/blob/dev-1.x/mmpose/datasets/transforms/common_transforms.py#L94)。
|
||
- `skeleton_info`:骨架连接关系,用于可视化。
|
||
- `joint_weights`:每个关键点的权重,用于损失函数计算。
|
||
- `sigma`:标准差,用于计算 OKS 分数,详细信息请参考 [keypoints-eval](https://cocodataset.org/#keypoints-eval)。
|
||
|
||
在模型配置文件中,你需要为自定义数据集指定对应的元信息配置文件。假如该元信息配置文件路径为 `$MMPOSE/configs/_base_/datasets/{your_dataset}.py`,指定方式如下:
|
||
|
||
```python
|
||
# dataset and dataloader settings
|
||
dataset_type = 'MyCustomDataset' # or 'CocoDataset'
|
||
train_dataloader = dict(
|
||
batch_size=2,
|
||
dataset=dict(
|
||
type=dataset_type,
|
||
data_root='aaa',
|
||
# 标注文件路径为 {data_root}/{ann_file}
|
||
# 例如: aaa/annotations/train.json
|
||
ann_file='annotations/train.json',
|
||
# 图片路径为 {data_root}/{img_path}/
|
||
# 例如: aaa/train/c.jpg
|
||
data_prefix=dict(img='train'),
|
||
# 指定对应的元信息配置文件
|
||
metainfo=dict(from_file='configs/_base_/datasets/custom.py'),
|
||
...),
|
||
)
|
||
val_dataloader = dict(
|
||
batch_size=2,
|
||
dataset=dict(
|
||
type=dataset_type,
|
||
data_root='aaa',
|
||
# 标注文件路径为 {data_root}/{ann_file}
|
||
# 例如: aaa/annotations/val.json
|
||
ann_file='annotations/val.json',
|
||
# 图片路径为 {data_root}/{img_path}/
|
||
# 例如: aaa/val/c.jpg
|
||
data_prefix=dict(img='val'),
|
||
# 指定对应的元信息配置文件
|
||
metainfo=dict(from_file='configs/_base_/datasets/custom.py'),
|
||
...),
|
||
)
|
||
test_dataloader = val_dataloader
|
||
```
|
||
|
||
下面是一个更加具体的例子,假设你的数据集按照以下结构进行组织:
|
||
|
||
```shell
|
||
data
|
||
├── annotations
|
||
│ ├── train.json
|
||
│ ├── val.json
|
||
├── train
|
||
│ ├── images
|
||
│ │ ├── 000001.jpg
|
||
├── val
|
||
│ ├── images
|
||
│ │ ├── 000002.jpg
|
||
```
|
||
|
||
你的数据集路径应该如下所示:
|
||
|
||
```
|
||
dataset=dict(
|
||
...
|
||
data_root='data/',
|
||
ann_file='annotations/train.json',
|
||
data_prefix=dict(img='train/images/'),
|
||
...),
|
||
```
|
||
|
||
### 数据集
|
||
|
||
在 MMPose 中使用自定义数据集时,我们推荐将数据转化为已支持的格式(如 COCO 或 MPII),并直接使用我们提供的对应数据集实现。如果这种方式不可行,则用户需要实现自己的数据集类。
|
||
|
||
更多自定义数据集的使用方式,请前往 [【进阶教程 - 自定义数据集】](./advanced_guides/customize_datasets.md)。
|
||
|
||
````{note}
|
||
如果你需要直接继承 [MMEngine](https://github.com/open-mmlab/mmengine) 中提供的 `BaseDataset` 基类。具体方法请参考相关[文档](https://mmengine.readthedocs.io/en/latest/advanced_tutorials/basedataset.html)
|
||
|
||
|
||
#### 2D 数据集
|
||
MMPose 中的大部分 2D 关键点数据集**以 COCO 形式组织**,为此我们提供了基类 [BaseCocoStyleDataset](https://github.com/open-mmlab/mmpose/blob/main/mmpose/datasets/datasets/base/base_coco_style_dataset.py)。我们推荐用户继承该基类,并按需重写它的方法(通常是 `__init__()` 和 `_load_annotations()` 方法),以扩展到新的 2D 关键点数据集。
|
||
|
||
```{note}
|
||
关于COCO数据格式的详细说明请参考 [COCO](./dataset_zoo/2d_body_keypoint.md) 。
|
||
````
|
||
|
||
在 MMPose 中 bbox 的数据格式采用 `xyxy`,而不是 `xywh`,这与 [MMDetection](https://github.com/open-mmlab/mmdetection) 等其他 OpenMMLab 成员保持一致。为了实现不同 bbox 格式之间的转换,我们提供了丰富的函数:`bbox_xyxy2xywh`、`bbox_xywh2xyxy`、`bbox_xyxy2cs`等。这些函数定义在 [$MMPOSE/mmpose/structures/bbox/transforms.py](https://github.com/open-mmlab/mmpose/blob/main/mmpose/structures/bbox/transforms.py)。
|
||
|
||
下面我们以 COCO 格式标注的 CrowdPose 数据集的实现([$MMPOSE/mmpose/datasets/datasets/body/crowdpose_dataset.py](https://github.com/open-mmlab/mmpose/blob/main/mmpose/datasets/datasets/body/crowdpose_dataset.py))为例:
|
||
|
||
```Python
|
||
@DATASETS.register_module()
|
||
class CrowdPoseDataset(BaseCocoStyleDataset):
|
||
"""CrowdPose dataset for pose estimation.
|
||
|
||
"CrowdPose: Efficient Crowded Scenes Pose Estimation and
|
||
A New Benchmark", CVPR'2019.
|
||
More details can be found in the `paper
|
||
<https://arxiv.org/abs/1812.00324>`__.
|
||
|
||
CrowdPose keypoints::
|
||
|
||
0: 'left_shoulder',
|
||
1: 'right_shoulder',
|
||
2: 'left_elbow',
|
||
3: 'right_elbow',
|
||
4: 'left_wrist',
|
||
5: 'right_wrist',
|
||
6: 'left_hip',
|
||
7: 'right_hip',
|
||
8: 'left_knee',
|
||
9: 'right_knee',
|
||
10: 'left_ankle',
|
||
11: 'right_ankle',
|
||
12: 'top_head',
|
||
13: 'neck'
|
||
|
||
Args:
|
||
ann_file (str): Annotation file path. Default: ''.
|
||
bbox_file (str, optional): Detection result file path. If
|
||
``bbox_file`` is set, detected bboxes loaded from this file will
|
||
be used instead of ground-truth bboxes. This setting is only for
|
||
evaluation, i.e., ignored when ``test_mode`` is ``False``.
|
||
Default: ``None``.
|
||
data_mode (str): Specifies the mode of data samples: ``'topdown'`` or
|
||
``'bottomup'``. In ``'topdown'`` mode, each data sample contains
|
||
one instance; while in ``'bottomup'`` mode, each data sample
|
||
contains all instances in a image. Default: ``'topdown'``
|
||
metainfo (dict, optional): Meta information for dataset, such as class
|
||
information. Default: ``None``.
|
||
data_root (str, optional): The root directory for ``data_prefix`` and
|
||
``ann_file``. Default: ``None``.
|
||
data_prefix (dict, optional): Prefix for training data. Default:
|
||
``dict(img=None, ann=None)``.
|
||
filter_cfg (dict, optional): Config for filter data. Default: `None`.
|
||
indices (int or Sequence[int], optional): Support using first few
|
||
data in annotation file to facilitate training/testing on a smaller
|
||
dataset. Default: ``None`` which means using all ``data_infos``.
|
||
serialize_data (bool, optional): Whether to hold memory using
|
||
serialized objects, when enabled, data loader workers can use
|
||
shared RAM from master process instead of making a copy.
|
||
Default: ``True``.
|
||
pipeline (list, optional): Processing pipeline. Default: [].
|
||
test_mode (bool, optional): ``test_mode=True`` means in test phase.
|
||
Default: ``False``.
|
||
lazy_init (bool, optional): Whether to load annotation during
|
||
instantiation. In some cases, such as visualization, only the meta
|
||
information of the dataset is needed, which is not necessary to
|
||
load annotation file. ``Basedataset`` can skip load annotations to
|
||
save time by set ``lazy_init=False``. Default: ``False``.
|
||
max_refetch (int, optional): If ``Basedataset.prepare_data`` get a
|
||
None img. The maximum extra number of cycles to get a valid
|
||
image. Default: 1000.
|
||
"""
|
||
|
||
METAINFO: dict = dict(from_file='configs/_base_/datasets/crowdpose.py')
|
||
```
|
||
|
||
对于使用 COCO 格式标注的数据集,只需要继承 [BaseCocoStyleDataset](https://github.com/open-mmlab/mmpose/blob/main/mmpose/datasets/datasets/base/base_coco_style_dataset.py) 并指定 `METAINFO`,就可以十分轻松地集成到 MMPose 中参与训练。
|
||
|
||
````
|
||
|
||
|
||
#### 3D 数据集
|
||
我们提供了基类 [BaseMocapStyleDataset](https://github.com/open-mmlab/mmpose/blob/main/mmpose/datasets/datasets/base/base_mocap_dataset.py)。我们推荐用户继承该基类,并按需重写它的方法(通常是 `__init__()` 和 `_load_annotations()` 方法),以扩展到新的 2D 关键点数据集。
|
||
|
||
### 数据流水线
|
||
|
||
一个典型的数据流水线配置如下:
|
||
|
||
```Python
|
||
# pipelines
|
||
train_pipeline = [
|
||
dict(type='LoadImage'),
|
||
dict(type='GetBBoxCenterScale'),
|
||
dict(type='RandomFlip', direction='horizontal'),
|
||
dict(type='RandomHalfBody'),
|
||
dict(type='RandomBBoxTransform'),
|
||
dict(type='TopdownAffine', input_size=codec['input_size']),
|
||
dict(type='GenerateTarget', encoder=codec),
|
||
dict(type='PackPoseInputs')
|
||
]
|
||
test_pipeline = [
|
||
dict(type='LoadImage'),
|
||
dict(type='GetBBoxCenterScale'),
|
||
dict(type='TopdownAffine', input_size=codec['input_size']),
|
||
dict(type='PackPoseInputs')
|
||
]
|
||
````
|
||
|
||
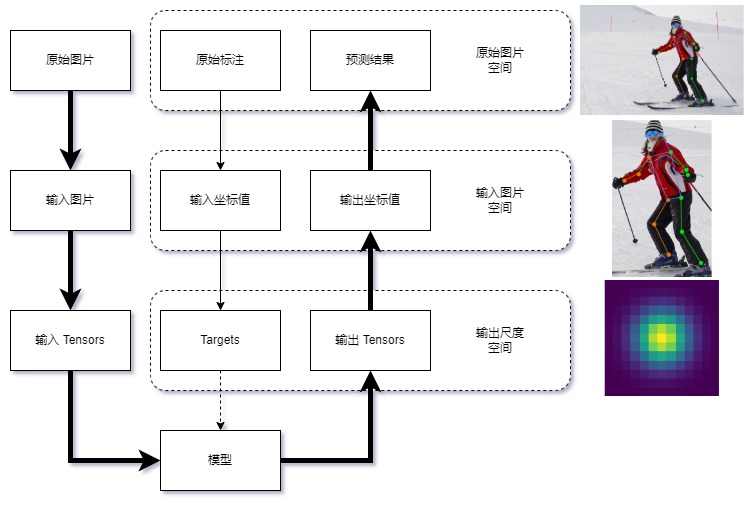
在关键点检测任务中,数据一般会在三个尺度空间中变换:
|
||
|
||
- **原始图片空间**:图片存储时的原始空间,不同图片的尺寸不一定相同
|
||
|
||
- **输入图片空间**:模型输入的图片尺度空间,所有**图片**和**标注**被缩放到输入尺度,如 `256x256`,`256x192` 等
|
||
|
||
- **输出尺度空间**:模型输出和训练监督信息所在的尺度空间,如`64x64(热力图)`,`1x1(回归坐标值)`等
|
||
|
||
数据在三个空间中变换的流程如图所示:
|
||
|
||
|
||
|
||
在MMPose中,数据变换所需要的模块在 [$MMPOSE/mmpose/datasets/transforms](https://github.com/open-mmlab/mmpose/tree/main/mmpose/datasets/transforms) 目录下,它们的工作流程如图所示:
|
||
|
||

|
||
|
||
#### i. 数据增强
|
||
|
||
数据增强中常用的变换存放在 [$MMPOSE/mmpose/datasets/transforms/common_transforms.py](https://github.com/open-mmlab/mmpose/blob/main/mmpose/datasets/transforms/common_transforms.py) 中,如 [RandomFlip](https://github.com/open-mmlab/mmpose/blob/dev-1.x/mmpose/datasets/transforms/common_transforms.py#L94)、[RandomHalfBody](https://github.com/open-mmlab/mmpose/blob/dev-1.x/mmpose/datasets/transforms/common_transforms.py#L263) 等。对于 top-down 方法,`Shift`、`Rotate`、`Resize` 操作由 [RandomBBoxTransform](https://github.com/open-mmlab/mmpose/blob/dev-1.x/mmpose/datasets/transforms/common_transforms.py#L433) 来实现;对于 bottom-up 方法,这些则是由 [BottomupRandomAffine](https://github.com/open-mmlab/mmpose/blob/dev-1.x/mmpose/datasets/transforms/bottomup_transforms.py#L134) 实现。
|
||
|
||
3D 姿态数据的变换存放在 [$MMPOSE/mmpose/datasets/transforms/pose3d_transforms.py](https://github.com/open-mmlab/mmpose/blob/main/mmpose/datasets/transforms/pose3d_transforms.py) 中。
|
||
|
||
```{note}
|
||
值得注意的是,大部分数据变换都依赖于 `bbox_center` 和 `bbox_scale`,它们可以通过 [GetBBoxCenterScale](https://github.com/open-mmlab/mmpose/blob/dev-1.x/mmpose/datasets/transforms/common_transforms.py#L31) 来得到。
|
||
```
|
||
|
||
#### ii. 数据变换
|
||
|
||
对于二维图片输入,我们使用仿射变换,将图像和坐标标注从原始图片空间变换到输入图片空间。这一操作在 top-down 方法中由 [TopdownAffine](https://github.com/open-mmlab/mmpose/blob/dev-1.x/mmpose/datasets/transforms/topdown_transforms.py#L14) 完成,在 bottom-up 方法中则由 [BottomupRandomAffine](https://github.com/open-mmlab/mmpose/blob/dev-1.x/mmpose/datasets/transforms/bottomup_transforms.py#L134) 完成。
|
||
|
||
对于 3D 姿态提升任务,变换被合并进[数据编码](./guide_to_framework.md#iii-数据编码)。
|
||
|
||
#### iii. 数据编码
|
||
|
||
在模型训练时,数据从原始空间变换到输入图片空间后,需要使用 [GenerateTarget](https://github.com/open-mmlab/mmpose/blob/dev-1.x/mmpose/datasets/transforms/common_transforms.py#L873) 来生成训练所需的监督目标(比如用坐标值生成高斯热图),我们将这一过程称为编码(Encode),反之,通过高斯热图得到对应坐标值的过程称为解码(Decode)。
|
||
|
||
在 MMPose 中,我们将编码和解码过程集合成一个编解码器(Codec),在其中实现 `encode()` 和 `decode()`。
|
||
|
||
目前 MMPose 支持生成以下类型的监督目标:
|
||
|
||
- `heatmap`: 高斯热图
|
||
- `keypoint_label`: 关键点标签(如归一化的坐标值)
|
||
- `keypoint_xy_label`: 单个坐标轴关键点标签
|
||
- `heatmap+keypoint_label`: 同时生成高斯热图和关键点标签
|
||
- `multiscale_heatmap`: 多尺度高斯热图
|
||
- `lifting_target_label`: 3D 提升目标的关键点标签
|
||
|
||
生成的监督目标会按以下关键字进行封装:
|
||
|
||
- `heatmaps`:高斯热图
|
||
- `keypoint_labels`:关键点标签(如归一化的坐标值)
|
||
- `keypoint_x_labels`:x 轴关键点标签
|
||
- `keypoint_y_labels`:y 轴关键点标签
|
||
- `keypoint_weights`:关键点权重
|
||
- `lifting_target_label`: 3D 提升目标的关键点标签
|
||
- `lifting_target_weight`: 3D 提升目标的关键点权重
|
||
|
||
```Python
|
||
@TRANSFORMS.register_module()
|
||
class GenerateTarget(BaseTransform):
|
||
"""Encode keypoints into Target.
|
||
|
||
Added Keys (depends on the args):
|
||
- heatmaps
|
||
- keypoint_labels
|
||
- keypoint_x_labels
|
||
- keypoint_y_labels
|
||
- keypoint_weights
|
||
"""
|
||
```
|
||
|
||
值得注意的是,我们对 top-down,pose-lifting 和 bottom-up 的数据格式进行了统一,这意味着标注信息中会新增一个维度来代表同一张图里的不同目标(如人),格式为:
|
||
|
||
```Python
|
||
[batch_size, num_instances, num_keypoints, dim_coordinates]
|
||
```
|
||
|
||
- top-down 和 pose-lifting:`[B, 1, K, D]`
|
||
|
||
- bottom-up: `[B, N, K, D]`
|
||
|
||
当前已经支持的编解码器定义在 [$MMPOSE/mmpose/codecs](https://github.com/open-mmlab/mmpose/tree/main/mmpose/codecs) 目录下,如果你需要自定新的编解码器,可以前往[编解码器](./user_guides/codecs.md)了解更多详情。
|
||
|
||
#### iv. 数据打包
|
||
|
||
数据经过前处理变换后,最终需要通过 [PackPoseInputs](https://github.com/open-mmlab/mmpose/blob/main/mmpose/datasets/transforms/formatting.py) 打包成数据样本。
|
||
|
||
打包过程会将数据流水线中用字典 `results` 存储的数据转换成用 MMPose 所需的标准数据结构, 如 `InstanceData`,`PixelData`,[PoseDataSample](https://github.com/open-mmlab/mmpose/blob/dev-1.x/mmpose/structures/pose_data_sample.py) 等。
|
||
|
||
具体而言,我们将数据样本内容分为 `gt`(标注真值) 和 `pred`(模型预测)两部分,它们都包含以下数据项:
|
||
|
||
- **instances**(numpy.array):实例级别的原始标注或预测结果,属于原始尺度空间
|
||
|
||
- **instance_labels**(torch.tensor):实例级别的训练标签(如归一化的坐标值、关键点可见性),属于输出尺度空间
|
||
|
||
- **fields**(torch.tensor):像素级别的训练标签(如高斯热图)或预测结果,属于输出尺度空间
|
||
|
||
下面是 [PoseDataSample](https://github.com/open-mmlab/mmpose/blob/dev-1.x/mmpose/structures/pose_data_sample.py) 底层实现的例子:
|
||
|
||
```Python
|
||
def get_pose_data_sample(self):
|
||
# meta
|
||
pose_meta = dict(
|
||
img_shape=(600, 900), # [h, w, c]
|
||
crop_size=(256, 192), # [h, w]
|
||
heatmap_size=(64, 48), # [h, w]
|
||
)
|
||
|
||
# gt_instances
|
||
gt_instances = InstanceData()
|
||
gt_instances.bboxes = np.random.rand(1, 4)
|
||
gt_instances.keypoints = np.random.rand(1, 17, 2)
|
||
|
||
# gt_instance_labels
|
||
gt_instance_labels = InstanceData()
|
||
gt_instance_labels.keypoint_labels = torch.rand(1, 17, 2)
|
||
gt_instance_labels.keypoint_weights = torch.rand(1, 17)
|
||
|
||
# pred_instances
|
||
pred_instances = InstanceData()
|
||
pred_instances.keypoints = np.random.rand(1, 17, 2)
|
||
pred_instances.keypoint_scores = np.random.rand(1, 17)
|
||
|
||
# gt_fields
|
||
gt_fields = PixelData()
|
||
gt_fields.heatmaps = torch.rand(17, 64, 48)
|
||
|
||
# pred_fields
|
||
pred_fields = PixelData()
|
||
pred_fields.heatmaps = torch.rand(17, 64, 48)
|
||
data_sample = PoseDataSample(
|
||
gt_instances=gt_instances,
|
||
pred_instances=pred_instances,
|
||
gt_fields=gt_fields,
|
||
pred_fields=pred_fields,
|
||
metainfo=pose_meta)
|
||
|
||
return data_sample
|
||
```
|
||
|
||
## Step3: 模型
|
||
|
||
在 MMPose 1.0中,模型由以下几部分构成:
|
||
|
||
- **预处理器(DataPreprocessor)**:完成图像归一化和通道转换等前处理
|
||
|
||
- **主干网络 (Backbone)**:用于特征提取
|
||
|
||
- **颈部模块(Neck)**:GAP,FPN 等可选项
|
||
|
||
- **预测头(Head)**:用于实现核心算法功能和损失函数定义
|
||
|
||
我们在 [$MMPOSE/mmpose/models/pose_estimators/base.py](https://github.com/open-mmlab/mmpose/blob/main/mmpose/models/pose_estimators/base.py) 下为姿态估计模型定义了一个基类 [BasePoseEstimator](https://github.com/open-mmlab/mmpose/blob/dev-1.x/mmpose/models/pose_estimators/base.py),所有的模型(如 [TopdownPoseEstimator](https://github.com/open-mmlab/mmpose/blob/dev-1.x/mmpose/models/pose_estimators/topdown.py))都需要继承这个基类,并重载对应的方法。
|
||
|
||
在模型的 `forward()` 方法中提供了三种不同的模式:
|
||
|
||
- `mode == 'loss'`:返回损失函数计算的结果,用于模型训练
|
||
|
||
- `mode == 'predict'`:返回输入尺度下的预测结果,用于模型推理
|
||
|
||
- `mode == 'tensor'`:返回输出尺度下的模型输出,即只进行模型前向传播,用于模型导出
|
||
|
||
开发者需要在 `PoseEstimator` 中按照模型结构调用对应的 `Registry` ,对模块进行实例化。以 top-down 模型为例:
|
||
|
||
```Python
|
||
@MODELS.register_module()
|
||
class TopdownPoseEstimator(BasePoseEstimator):
|
||
def __init__(self,
|
||
backbone: ConfigType,
|
||
neck: OptConfigType = None,
|
||
head: OptConfigType = None,
|
||
train_cfg: OptConfigType = None,
|
||
test_cfg: OptConfigType = None,
|
||
data_preprocessor: OptConfigType = None,
|
||
init_cfg: OptMultiConfig = None):
|
||
super().__init__(data_preprocessor, init_cfg)
|
||
|
||
self.backbone = MODELS.build(backbone)
|
||
|
||
if neck is not None:
|
||
self.neck = MODELS.build(neck)
|
||
|
||
if head is not None:
|
||
self.head = MODELS.build(head)
|
||
```
|
||
|
||
### 前处理器(DataPreprocessor)
|
||
|
||
从 MMPose 1.0 开始,我们在模型中添加了新的前处理器模块,用以完成图像归一化、通道顺序变换等操作。这样做的好处是可以利用 GPU 等设备的计算能力加快计算,并使模型在导出和部署时更具完整性。
|
||
|
||
在配置文件中,一个常见的 `data_preprocessor` 如下:
|
||
|
||
```Python
|
||
data_preprocessor=dict(
|
||
type='PoseDataPreprocessor',
|
||
mean=[123.675, 116.28, 103.53],
|
||
std=[58.395, 57.12, 57.375],
|
||
bgr_to_rgb=True),
|
||
```
|
||
|
||
它会将输入图片的通道顺序从 `bgr` 转换为 `rgb`,并根据 `mean` 和 `std` 进行数据归一化。
|
||
|
||
### 主干网络(Backbone)
|
||
|
||
MMPose 实现的主干网络存放在 [$MMPOSE/mmpose/models/backbones](https://github.com/open-mmlab/mmpose/tree/main/mmpose/models/backbones) 目录下。
|
||
|
||
在实际开发中,开发者经常会使用预训练的网络权重进行迁移学习,这能有效提升模型在小数据集上的性能。 在 MMPose 中,只需要在配置文件 `backbone` 的 `init_cfg` 中设置:
|
||
|
||
```Python
|
||
init_cfg=dict(
|
||
type='Pretrained',
|
||
checkpoint='PATH/TO/YOUR_MODEL_WEIGHTS.pth'),
|
||
```
|
||
|
||
如果你想只加载一个训练好的 checkpoint 的 backbone 部分,你需要指明一下前缀 `prefix`:
|
||
|
||
```Python
|
||
init_cfg=dict(
|
||
type='Pretrained',
|
||
prefix='backbone.',
|
||
checkpoint='PATH/TO/YOUR_CHECKPOINT.pth'),
|
||
```
|
||
|
||
其中 `checkpoint` 既可以是本地路径,也可以是下载链接。因此,如果你想使用 Torchvision 提供的预训练模型(比如ResNet50),可以使用:
|
||
|
||
```Python
|
||
init_cfg=dict(
|
||
type='Pretrained',
|
||
checkpoint='torchvision://resnet50')
|
||
```
|
||
|
||
除了这些常用的主干网络以外,你还可以从 MMClassification 等其他 OpenMMLab 项目中方便地迁移主干网络,它们都遵循同一套配置文件格式,并提供了预训练权重可供使用。
|
||
|
||
需要强调的是,如果你加入了新的主干网络,需要在模型定义时进行注册:
|
||
|
||
```Python
|
||
@MODELS.register_module()
|
||
class YourBackbone(BaseBackbone):
|
||
```
|
||
|
||
同时在 [$MMPOSE/mmpose/models/backbones/\_\_init\_\_.py](https://github.com/open-mmlab/mmpose/blob/main/mmpose/models/backbones/__init__.py) 下进行 `import`,并加入到 `__all__` 中,才能被配置文件正确地调用。
|
||
|
||
### 颈部模块(Neck)
|
||
|
||
MMPose 中 Neck 相关的模块定义在 [$MMPOSE/mmpose/models/necks](https://github.com/open-mmlab/mmpose/tree/main/mmpose/models/necks) 目录下.
|
||
|
||
颈部模块通常是介于主干网络和预测头之间的模块,在部分模型算法中会用到,常见的颈部模块有:
|
||
|
||
- Global Average Pooling (GAP)
|
||
|
||
- Feature Pyramid Networks (FPN)
|
||
|
||
- Feature Map Processor (FMP)
|
||
|
||
[FeatureMapProcessor](https://github.com/open-mmlab/mmpose/blob/dev-1.x/mmpose/models/necks/fmap_proc_neck.py) 是一个通用的 PyTorch 模块,旨在通过选择、拼接和缩放等非参数变换将主干网络输出的特征图转换成适合预测头的格式。以下是一些操作的配置方式及效果示意图:
|
||
|
||
- 选择操作
|
||
|
||
```python
|
||
neck=dict(type='FeatureMapProcessor', select_index=0)
|
||
```
|
||
|
||
<img src="https://user-images.githubusercontent.com/26127467/227108468-b44c9c13-9e51-403c-a035-b17b5268acc3.png" height="100px" alt><br>
|
||
|
||
- 拼接操作
|
||
|
||
```python
|
||
neck=dict(type='FeatureMapProcessor', concat=True)
|
||
```
|
||
|
||
<img src="https://user-images.githubusercontent.com/26127467/227108705-4d197c71-4019-42cb-abdb-ba159111abb4.png" height="85px" alt><br>
|
||
|
||
拼接之前,其它特征图会被缩放到和序号为 0 的特征图相同的尺寸。
|
||
|
||
- 缩放操作
|
||
|
||
```python
|
||
neck=dict(type='FeatureMapProcessor', scale_factor=2.0)
|
||
```
|
||
|
||
<img src="https://user-images.githubusercontent.com/26127467/227109402-94106e4b-b941-4ce9-8201-c64920d82ed1.png" height="120px" alt><br>
|
||
|
||
### 预测头(Head)
|
||
|
||
通常来说,预测头是模型算法实现的核心,用于控制模型的输出,并进行损失函数计算。
|
||
|
||
MMPose 中 Head 相关的模块定义在 [$MMPOSE/mmpose/models/heads](https://github.com/open-mmlab/mmpose/tree/main/mmpose/models/heads) 目录下,开发者在自定义预测头时需要继承我们提供的基类 [BaseHead](https://github.com/open-mmlab/mmpose/blob/main/mmpose/models/heads/base_head.py),并重载以下三个方法对应模型推理的三种模式:
|
||
|
||
- forward()
|
||
|
||
- predict()
|
||
|
||
- loss()
|
||
|
||
具体而言,`predict()` 返回的应是输入图片尺度下的结果,因此需要调用 `self.decode()` 对网络输出进行解码,这一过程实现在 [BaseHead](https://github.com/open-mmlab/mmpose/blob/main/mmpose/models/heads/base_head.py) 中已经实现,它会调用编解码器提供的 `decode()` 方法来完成解码。
|
||
|
||
另一方面,我们会在 `predict()` 中进行测试时增强。在进行预测时,一个常见的测试时增强技巧是进行翻转集成。即,将一张图片先进行一次推理,再将图片水平翻转进行一次推理,推理的结果再次水平翻转回去,对两次推理的结果进行平均。这个技巧能有效提升模型的预测稳定性。
|
||
|
||
下面是在 [RegressionHead](https://github.com/open-mmlab/mmpose/blob/main/mmpose/models/heads/regression_heads/regression_head.py) 中定义 `predict()` 的例子:
|
||
|
||
```Python
|
||
def predict(self,
|
||
feats: Tuple[Tensor],
|
||
batch_data_samples: OptSampleList,
|
||
test_cfg: ConfigType = {}) -> Predictions:
|
||
"""Predict results from outputs."""
|
||
|
||
if test_cfg.get('flip_test', False):
|
||
# TTA: flip test -> feats = [orig, flipped]
|
||
assert isinstance(feats, list) and len(feats) == 2
|
||
flip_indices = batch_data_samples[0].metainfo['flip_indices']
|
||
input_size = batch_data_samples[0].metainfo['input_size']
|
||
_feats, _feats_flip = feats
|
||
_batch_coords = self.forward(_feats)
|
||
_batch_coords_flip = flip_coordinates(
|
||
self.forward(_feats_flip),
|
||
flip_indices=flip_indices,
|
||
shift_coords=test_cfg.get('shift_coords', True),
|
||
input_size=input_size)
|
||
batch_coords = (_batch_coords + _batch_coords_flip) * 0.5
|
||
else:
|
||
batch_coords = self.forward(feats) # (B, K, D)
|
||
|
||
batch_coords.unsqueeze_(dim=1) # (B, N, K, D)
|
||
preds = self.decode(batch_coords)
|
||
```
|
||
|
||
`loss()`除了进行损失函数的计算,还会进行 accuracy 等训练时指标的计算,并通过一个字典 `losses` 来传递:
|
||
|
||
```Python
|
||
# calculate accuracy
|
||
_, avg_acc, _ = keypoint_pck_accuracy(
|
||
pred=to_numpy(pred_coords),
|
||
gt=to_numpy(keypoint_labels),
|
||
mask=to_numpy(keypoint_weights) > 0,
|
||
thr=0.05,
|
||
norm_factor=np.ones((pred_coords.size(0), 2), dtype=np.float32))
|
||
|
||
acc_pose = torch.tensor(avg_acc, device=keypoint_labels.device)
|
||
losses.update(acc_pose=acc_pose)
|
||
```
|
||
|
||
每个 batch 的数据都打包成了 `batch_data_samples`。以 Regression-based 方法为例,训练所需的归一化的坐标值和关键点权重可以用如下方式获取:
|
||
|
||
```Python
|
||
keypoint_labels = torch.cat(
|
||
[d.gt_instance_labels.keypoint_labels for d in batch_data_samples])
|
||
keypoint_weights = torch.cat([
|
||
d.gt_instance_labels.keypoint_weights for d in batch_data_samples
|
||
])
|
||
```
|
||
|
||
以下为 [RegressionHead](https://github.com/open-mmlab/mmpose/blob/main/mmpose/models/heads/regression_heads/regression_head.py) 中完整的 `loss()` 实现:
|
||
|
||
```Python
|
||
def loss(self,
|
||
inputs: Tuple[Tensor],
|
||
batch_data_samples: OptSampleList,
|
||
train_cfg: ConfigType = {}) -> dict:
|
||
"""Calculate losses from a batch of inputs and data samples."""
|
||
|
||
pred_outputs = self.forward(inputs)
|
||
|
||
keypoint_labels = torch.cat(
|
||
[d.gt_instance_labels.keypoint_labels for d in batch_data_samples])
|
||
keypoint_weights = torch.cat([
|
||
d.gt_instance_labels.keypoint_weights for d in batch_data_samples
|
||
])
|
||
|
||
# calculate losses
|
||
losses = dict()
|
||
loss = self.loss_module(pred_outputs, keypoint_labels,
|
||
keypoint_weights.unsqueeze(-1))
|
||
|
||
if isinstance(loss, dict):
|
||
losses.update(loss)
|
||
else:
|
||
losses.update(loss_kpt=loss)
|
||
|
||
# calculate accuracy
|
||
_, avg_acc, _ = keypoint_pck_accuracy(
|
||
pred=to_numpy(pred_outputs),
|
||
gt=to_numpy(keypoint_labels),
|
||
mask=to_numpy(keypoint_weights) > 0,
|
||
thr=0.05,
|
||
norm_factor=np.ones((pred_outputs.size(0), 2), dtype=np.float32))
|
||
acc_pose = torch.tensor(avg_acc, device=keypoint_labels.device)
|
||
losses.update(acc_pose=acc_pose)
|
||
|
||
return losses
|
||
```
|
||
|
||
```{note}
|
||
如果你想了解更多模型实现的内容,如:
|
||
- 支持关键点可见性预测的头部
|
||
- 2D-to-3D 模型实现
|
||
|
||
请前往 [【进阶教程 - 实现新模型】](./advanced_guides/implement_new_models.md)
|
||
```
|